Crêpes!

The first Friday of the month is reserved for recipes. You can see additional First Friday Food posts here.

The Reason:

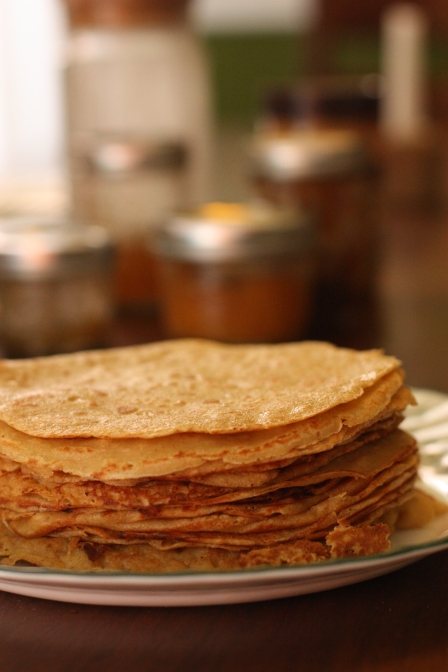
I’m still trying to burn through some of my stored-up food posts, and that means pancakes! So you’re getting another First Friday Food that is not on a First Friday.

As far as the reason to make crepes, one day it just occurred to me that I could make crepes. With whole wheat flour no less! We’re always looking for good pancake recipes, and crepes are a significantly different form of pancake.

The Journey:

First off, I’d like to specify that I originally learned how to make crepes from an actual frenchman. I don’t have his fancy pan or fancy crepe-scraping tool, but make no mistake, I know how to get the job done.

All that being said, flipping crepes is no joke, even if you don’t flip them in the air. There is certainly a skill to it. Be prepared to have ripped up and shredded crepes, even after making hundreds and hundreds of the things. Making crepes is somewhat stressful, and requires your full attention. But afterwards, you get to eat crepes, and the ripped up ones taste the same as the nice ones!

2013_04_21_9971

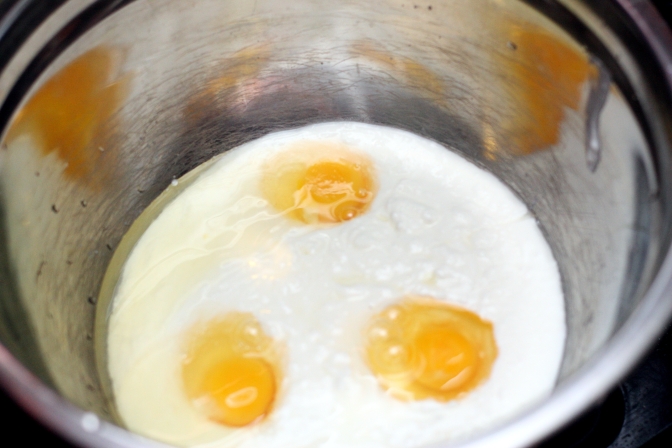
The recipe calls for the ingredients to be mixed in a blender. Do it! I tried everything I could to avoid it, including mixing with a mixer. It doesn’t work. If you get chunks in your batter, they will stick to the pan, and then you’re not going to get nice looking ones.

Also, use a LOT of butter on the pan, in between each and every crepe. You really can’t over-butter it. Just remind yourself you’re cooking like a French person, and throw an extra pat on there. You’ll thank yourself when you try to flip one.

The Verdict:

Making crepes is not that difficult, but it is a LOT of work. You have to make LOTS of them, because people will eat them way faster than you can make them. It’s a marathon, not a sprint.

But, might I add, they make you look very fancy pants impressive.

Crepes are so versatile. You can basically put anything on a crepe. Even setting aside savory crepes, you have jellies, jams, curds, marmalades, peanut butter, nutella, and just plain sugar. You could have these every day of the week and not get tired of them.

Well, not get tired of *eating* them. But you will definitely get tired of making them.

2013_04_21_9969

The Recipe:

Recipe from 100 Days of Real Food.

  • 3 eggs
  • 1 cup whole-wheat flour
  • 1 cup milk
  • ¾ cup water
  • 1 tablespoon honey
  • 1 teaspoon vanilla
  • ¼ teaspoon salt
  • 1 tablespoon butter, melted + extra for cooking
  1. Put all ingredients in blender and mix well. Let stand about 15 minutes.
  2. Melt and swirl around a small pat of butter in an 8 or 10-inch frying pan over medium heat.
  3. Angle pan and pour enough batter on one side to thinly and evenly cover the pan. Very quickly swirl the batter around to cover the pan in one thin layer.
  4. Immediately use your cooking spatula to push down the thin edges of the crepe around the perimeter.
  5. After about 1 minute (and once it is golden brown on the bottom) carefully flip it over without tearing the crepe.
  6. Fry for 1 more minute on the other side (until it is golden brown as well) and then roll up each crepe.

White Bean and Tuna Salad with Radicchio and Parsley Vinaigrette

The first Friday of the month is reserved for recipes. You can see additional First Friday Food posts here.

The Reason:

Boy, I don’t know where this one came from. I think we just saw it in Bon Appetit and decided to try it. But the real reasons to make it are, 1) it’s delicious, and 2) it’s SUPER quick and easy.

The Journey:

This would work well as a fancy-pants side dish, but we just serve it as a meal, all by itself. I guess it has a lot of oil in it, but other than that it’s about as healthy as a dinner comes, and packs a lot more flavor than your average salad. Plus it’s different and interesting. I’m really having trouble thinking of any downsides.

2013_03_06_9746

Radicchio is a little bitter, so normally I’m not a huge fan. But in this case, the bitterness really sets off the vinaigrette perfectly, and the tuna and beans give it texture and some staying power in your tummy.

2013_03_06_9748

The Verdict:

I feel like a broken record here, but we have an endless appetite for quick, easy, and healthy recipes. We can never have enough of them. This one is in heavy rotation for nights when Sara and I both work.

2013_03_06_9750

The Recipe:

Recipe originally from Bon Appetit:

Parsley Vinaigrette

  • 2 cups (packed) flat-leaf parsley (leaves and stems)
  • 1/4 cup olive oil
  • 3 tablespoons fresh lemon juice
  • 1 tablespoon Champagne vinegar (we found it at Trader Joes)
  • 2 garlic cloves, crushed
  • Kosher salt and freshly ground black pepper
  1. Pulse parsley, oil, lemon juice, vinegar, and garlic in a food processor until well blended. Season to taste with salt and pepper (~1/4 teaspoon salt and ~1/8 teaspoon pepper).

White Bean and Tuna Salad with Radicchio

  • 1 medium head of radicchio, cored, leaves coarsely torn
  • 2 15-ounce cans cannellini (white kidney) beans, rinsed, drained
  • 2 celery stalks, sliced thinly on an extreme diagonal
  • 2 cans drained olive oil–packed tuna
  1. Place radicchio in a large bowl; drizzle with 3 Tbsp. Parsley Vinaigrette and toss to coat.
  2. Transfer to a serving platter, spreading out in an even layer.
  3. Combine 3 Tbsp. Parsley Vinaigrette, cannellini beans, and celery in the large bowl; toss to coat.
  4. Arrange bean mixture on top of radicchio.
  5. Top salad with tuna.
  6. Drizzle some vinaigrette over.
  7. Add more salt and pepper, to taste.

Russian Yogurt Pancakes

The first Friday of the month is reserved for recipes. You can see additional First Friday Food posts here.

The Reason:

“Wait a minute,” you’re saying. “This is not the first Friday of the month. Is there something wrong with my calendar?” No, you’re right. But I have so many food posts queuing up that I need to clear out a little inventory.

And it’s been far, FAR too long since we’ve had a pancake recipe on here!

The Journey:

These are yogurt pancakes, and as such, they take a lot of yogurt. I highly recommend making your own, which is cheap and simple. In fact, you can even use old yogurt that is starting to go bad!

2013_03_31_9816

These are some of the most amazing, moist pancakes that I’ve ever had. The texture is absolutely perfect. Usually my pancakes are a little on the tough side since I use only whole wheat flour, which tends to be a little denser. The downside is that these are a little hard to work with in the pan; they are very tricky to flip. It’s well worth the effort though, and who cares what they look like anyway!

2013_03_31_9820

My advice to offset this is to make very small pancakes. They’re easier to flip, and you can pretend like you’re a giant who needs to eat 80 pancakes for breakfast every morning.

2013_03_31_9823

The Verdict:

These are so amazing. They’re moist and the yogurt gives them a buttery flavor, so you don’t need to put extra butter on top. The original recipe says you can top them with something savory instead of sweet, which I could totally see. And you can even use up yogurt that’s going bad! No downsides on this one. This is in our regular pancake rotation.

2013_03_31_9824

The Recipe:

Recipe from A Girl’s Guide to Butter.

  • 4 cups plain yogurt (going bad OK)
  • 3 eggs
  • 4 tablespoons sugar
  • 1 teaspoon salt
  • 2 teaspoons baking soda
  • Enough (whole-wheat) flour to make a medium-thick batter (one that holds its shape but is still a liquid rather than a paste). I use a little less than 2 cups.
  • oil, for frying (we use coconut oil)
  1. Mix all the ingredients together except for oil, and beat until smooth.
  2. Heat the oil in a cast iron skillet over medium-high heat until almost smoking.
  3. Using a large tablespoon, spoon the batter into the pan in the form of small oval pancakes.
  4. Fry on one side until golden-brown, then flip, reducing the heat to medium, and cook until the other side is golden-brown as well. Be sure to add more oil if your skillet becomes dry.
  5. Remove to a platter and top with any of the desired toppings.

Szechuan Pork and Green Beans

The first Friday of the month is reserved for recipes. You can see additional First Friday Food posts here.

The Reason:

Honestly? I think the reason was that we were looking for a recipe to use up ground pork. But this recipe is so good, you’ll definitely want to buy more ground pork, which leaves you more ground pork left overs…it’s a vicious circle.

The Journey:

Have you ever really smelled white pepper? Go smell it and come back. I’ll wait.

Okay, yes, it smells absolutely odious, but does it smell familiar to you? Because everyone around here agrees that it smells exactly like a hog farm. This is not a positive. I can barely bring myself to put it on my food. And yet, this dish is delicious. Maybe you need a little hog farm for the pork, I don’t know.

Schezuan is Chinese for “melt your face off”, or so I assume, because Schezuan food is spicy! This dish is no exception. I suppose you could try to make it less spicy, but honestly I wouldn’t bother. It would really take away from the dish. Serving it over rice helps with the heat a little bit, but if you have trouble with spicy food though, maybe you should avoid it.

The Verdict:

So yummy and so easy to make.

One word of warning though; do not buy Trader Joe’s soy sauce! I love Trader Joe’s, but we made that mistake and we’re still paying the price. We have to mix it in with Kikkoman a little at a time to get rid of it.

The Recipe:

Recipe from myrecipes.com.

  • 1 pound lean ground pork
  • 2 teaspoon cornstarch
  • 1/4 teaspoon salt
  • 1/8 teaspoon freshly ground white pepper
  • 1 Tablespoon olive oil (+ a few drops of seasame or peanut oil if you have them)
  • 5 cups cut green beans
  • 2 teaspoons minced fresh garlic
  • 4 tablespoons hoisin sauce
  • 2 teaspoons sugar
  • 2 teaspoons crushed red pepper
  • 4 teaspoons soy sauce
  • 4 cups hot cooked brown rice
  1. Combine the pork, cornstarch, salt and white pepper in a medium bowl.
  2. Heat oil in a large nonstick skillet over medium-high heat. Add pork mixture, beans, and garlic; cook 3 minutes or until pork loses its pink color, stirring to crumble.
  3. Combine hoisin, sugar, red pepper and soy sauce in a small bowl, stirring with a whisk.
  4. Add hoisin mixture to pan. Cook 2 minutes or until thoroughly heated, stirring frequently.
  5. Serve over rice.

Saffron Zucchini Couscous

The first Friday of the month is reserved for recipes. You can see additional First Friday Food posts here.

The Reason:

The recipe came from my sister Rachael. I don’t remember when she first made it, but she seemed pretty excited to share it with us, since I don’t think she gets many requests for it.

The Journey:

This is something we make a *lot*. In fact, going out on a limb here, I’m going to guess we make it more than Rachael does.

If you follow along on these First Friday Food posts, you’ll notice the major theme is that this is both healthy and easy to make.

The interesting thing is that it uses saffron. If you’re unfamiliar, saffron looks like tiny red threads and is ridiculously expensive. In fact, by weight, it’s one of the most expensive spices in the world. I’ve heard this is because each flower produces only one thread, and it must be harvested by hand. Luckily, you only need to use very little.

The major change that we made to Rachael’s original recipe was to add chickpeas. I guess you could consider them optional, but I think they’re perfect. They add some good texture and stretch it a little bit, without adding any extra work.

The Verdict:

Scrumdiddlyumptious. You can eat it hot, you can eat it cold (one time I ate it so cold it had icicles in it, but I probably wouldn’t recommend that). You can eat it immediately, or make it in advance. You can take it as a dish to pass and even the kids will eat it. What’s not to love?

The Recipe:

Recipe courtesy my sister.

  • 1 1/2 cups vegetable stock
  • 1/2 teaspoon salt
  • 1/2 teaspoon pepper
  • 1/4 teaspoon cumin
  • 1/2 teaspoon saffron threads
  • 2 tablespoons butter
  • 2 zucchini, diced
  • 1 can chickpeas
  • 1 1/2 cups whole wheat couscous
  • 1 cup chopped basil leaves
  • 1 cup chopped parsley leaves
  1. Bring stock to boil, and turn off heat.
  2. Add spices and steep for 15 minutes.
  3. Heat butter in frying pan. Saute zucchini for 5 mins.
  4. Bring stock to boil again.
  5. Place couscous in bowl and add zucchini and chickpeas. Pour hot stock over this, and cover tightly.
  6. Stand for 15 minutes.
  7. Add basil and parsley, and toss with fork. Serve warm or room temperature.