Robocode is an interactive programming game. Players code up a “robot” (which looks like a little tank) using Java, with as much or as little intelligence as they want to include. These robots can then be pitted against each other in a virtual arena to determine an ultimate Robocode champion!
Building a robot is both easy and hard at the same time. A basic robot can be put together in a matter of minutes. A very complicated robot can take years to perfect. Everything in between is possible, depending on how much time one wants to spend. In my experience (and much to my chagrin), a more complicated robot is not necessarily better than a simple robot!
Installing Robocode
The first step is to download Robocode from SourceForge.
You must have Java 8 or higher installed on your system, and have the following environment variables setup (additional details here):
JAVA_HOME must be set up to point at the home directory for Java (JDK or JRE).
Windows example:JAVA_HOME=C:\Program Files\AdoptOpenJDK\jdk-16.0.0.36-hotspot
Linux and macOS example:JAVA_HOME=/usr/lib/jvm/adoptopenjdk-16-hotspot-amd64PATH must include the path to the
binof the Java home directory (JAVA_HOME) that includes thejavaexecutable for starting the Java Virtual Machine (JVM).
Windows example:PATH=%PATH%;%JAVA_HOME%
Linux, macOS example:PATH=${PATH}:${JAVA_HOME}/binThe Robocode UI can be run by executing the robocode.sh script in the robocode directory.
Robocode comes with an editor / compiler (accessible from the Robot -> Source Editor menu), but you may prefer to use an IDE such as VSCode.
Getting Setup in VSCode
Open up VSCode to the directory that you want to use as your repository. I suggest using the “robocode” folder that was installed on your computer. Your robot can be stored in the “robots” sub-directory.
First, we need to tell VSCode how to run and debug this type of application. Click on the “Run and Debug” button the side bar, and then click the “create a launch.json file” link.

Select “Java” as the environment. You may need to install the Extension pack for Java if you haven’t already.
You will get a skeleton launch.json file. Replace what is in that file with this:
"configurations": [
{
"type": "java",
"name": "Robocode",
"request": "launch",
"mainClass": "robocode.Robocode",
"vmArgs": ["-Xmx512M", "-Djava.security.manager=allow",
"-Dsun.io.useCanonCaches=false", "-Ddebug=true", "--add-opens=java.base/sun.net.www.protocol.jar=ALL-UNNAMED", "--add-opens=java.base/java.lang.reflect=ALL-UNNAMED", "--add-opens=java.desktop/sun.awt=ALL-UNNAMED" ],
"env": {
"JAVA_HOME": "/usr/libexec/java_home",
"PATH": "${PATH}:${JAVA_HOME}/bin"
},
}
]

*Note: after installing the latest Robocode, it must have updated my java! I had to update my JAVA_HOME variable to point to “/usr/libexec/java_home” but previously it pointed to /usr/lib/jvm/adoptopenjdk-16-hotspot-amd64
This will tell VSCode how to start Robocode with all of the required environment variables and command line arguments.
Now we need to tell VSCode how to find the Robocode libraries so we can access built in classes and functions. In the File Explorer in VSCode, you should see a .vscode folder with our launch.json file in it.
Right click on .vscode and say “New File”. Name your new file settings.json. Paste the following in there:
{
“java.project.referencedLibraries”: [
“lib/**/*.jar”, “libs/**/*.jar”
]
}

(This assumes you are in the Robocode directory, and therefore the Robocode libraries such as robocode.jar are located in a top-level “libs” directory. If that is not the case, adjust this path to point to the proper directory.)
Now when you Start Debugging in VSCode, it should launch the Robocode UI, and as you run with your robot selected, you should be able to hit breakpoints in your .java file!
Your First Robot
Go to your robocode/robots directory and create a new file with a .java extension (e.g. MyRobot.java). Open that file in the code editor of your choice. import robocode.AdvancedRobot at the top and create a new public class that extends AdvancedRobot.
Inside that class make a public void run() function. Inside the run function add an infinite loop like while (true). This is your “game loop” that will execute continuously while the battle is running. Inside that loop we will make your robot do something, and it will continue doing it until the game is over.
Additionally, robocode allows us to react to events. For example, when our robot scans another robot, it will send a “ScannedRobotEvent”. We can react to that event, for example, firing at the robot we scanned with our radar.
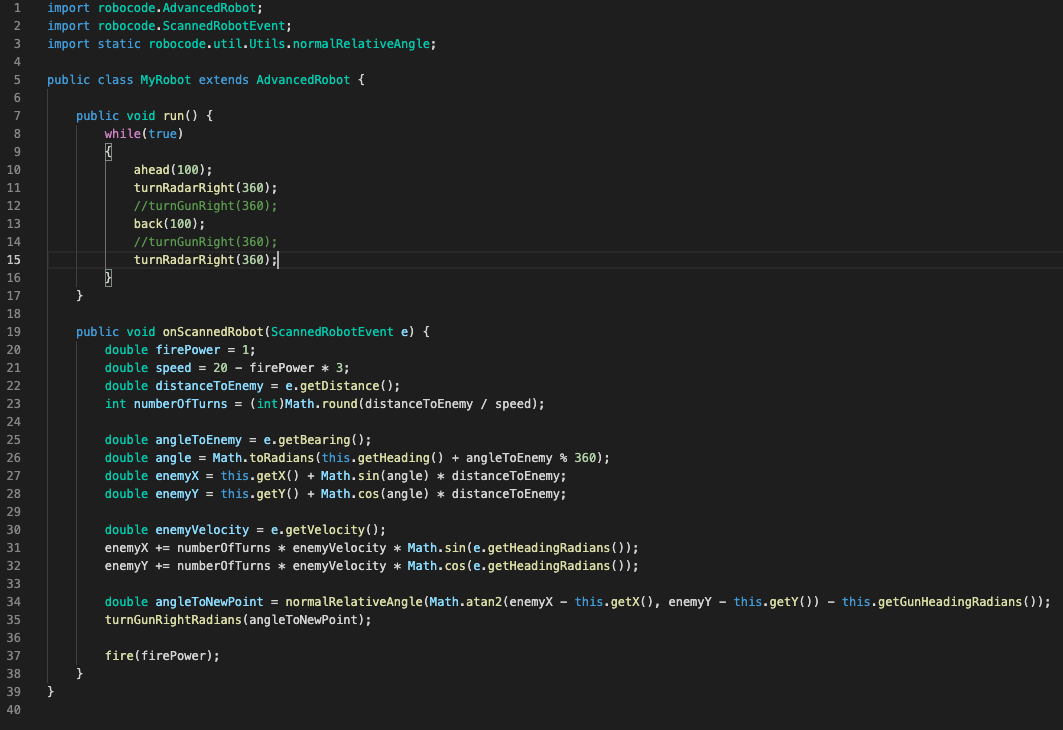
Combining all of the above, we get:

Voila! You have created a robot that will move ahead 100 pixels, turn its gun in a circle, move back 100 pixels, turn its gun in a circle, and repeat. If it sees another robot, it will shoot.
You can see another tutorial here that is more or less the same, but perhaps with better explanations! For a full list of events you can react to, see the full Robocode API.
To Battle!
Let’s see how your bot does. In the Robocode UI menu, go to Battle -> New. In the Packages list, click on “(No package)” and select MyRobot from the list. When it is highlighted, hit the “Add ->” button. MyRobot* should appear in the Selected Robots list.
Now click “sample” in the Packages list. This lists several sample robots that come pre-installed with Robocode. Highlight “Walls” and add that to the list.
When both MyRobot* and Walls are in the Selected Robots list, press the “Start Battle” button at the bottom. (If the battle does not begin, you might need to press the “Pause/Debug” button.) You can control the speed of the battle using the slider bar along the bottom.
Remember Trigonometry?
So, how did you do? Probably not that great! There is a lot to cover yet.
The main problem is that you are firing your gun when you see a robot, but that robot is not sitting still. So by the time the bullet gets to the position of the robot, it is no longer there. You are constantly firing where your opponent used to be. It would be much better to lead your opponent and fire where (we hope) they will be.
In order to do that, we need to understand a lot of things about they physics of the Robocode engine.
In order to lead the target, we would need to first know how long it will take our bullet to reach the target, then we need to know how far the target would travel during that length of time. Fortunately, we CAN know those things.
In Robocode, the speed of the bullet is calculated by the following formula:
speed = 20 – fire power * 3
Our fire power is 1 (the number we are passing to the fire() command). So we know the bullet is traveling 17 pixels per tick. In fact, our radar already tells us how far away the robot its (via the ScannedRobotEvent). If we divide that distance by the speed, we will know how many ticks it will take our bullet to reach them:

The next piece to know is how fast the enemy is moving. Luckily, our radar tells us that too, via the getVelocity() function on the ScannedRobotEvent)! So all we need to do is look at where the robot is currently and then…
Not so fast! The one thing our radar DOESN’T tell us is where the enemy actually is. We only know where that enemy is relative to our own position. So we will have to resort to good old fashioned trigonometry: if we take the sin of the angle we are currently pointing in plus the angle from our angle to the enemy times the distance and add that to our current X coordinate, we can find…

…well, you can see this starts to get complicated fast. And we still haven’t even figured out where the enemy WILL be, only where it currently is! To figure that out, we’d need to multiply the enemy’s velocity by number of turns it would take the bullet to get there and translate that in the direction the enemy is heading, like so:

Of course you now need to use your old friend Arctangent to figure out the angle to that point, so you can turn your gun to point in the direction where the enemy will eventually be! Putting it all together you have:
Compile that and see how you fare against Walls now. Better, right? But still not perfect. Can you think of any ways you could improve your targeting? Here are some suggestions:
- The Walls bot stops when it reaches the corner and turns, but this targeting assumes it continues going out of the field of play. How could you fix that?
- Number of Turns is based on how far away the robot is when we first see it, but what if the robot is moving towards us, or away from us? Why would that be a problem?
- The Walls bot always moves in a straight line, but what if it didn’t? How would you account for that in the algorithm?
- The Walls bot maintains a constant velocity. What if it didn’t?
This is only one method of targeting. Coming up with a targeting strategy that is better than your opponents is a key part of strategy.
Making Your Robot Multitask
Did you notice in the final screenshot up there I made change to the run() method? Originally we were turning the gun, and the radar was moving because it was attached to the gun. However, the radar is capable of moving independently from the gun and, as shown, we can (and should) do both things at the same time.
Furthermore, did you notice how the robot does everything sequentially? First it moves, then it turns the radar, then it shoots. If we could move, turn the radar, and shoot all at the same time it would be tremendously more efficient.
It turns out we can!
In addition to functions like ahead, back, turnRadarRight, turnGunRight, and fire, there are “set” versions of all of those functions (setAhead, setBack, setTurnRadarRight, setTurnGunRight, and setFire, respectively). These will tell the robot what we want to do, but will not actually execute those commands. Finally, we call execute at the end of the game loop to have them all execute in one go. So instead of moving, then turning the radar, then shooting, we can move, turn the radar, and shoot, all at the same time. Try this:

Do you notice your robot looking a lot snappier?
TIP: Because the gun is mounted on the robot, and the radar is mounted on the gun, turning one will turn the other (i.e. if the robot is pointing North and the gun is pointing straight ahead, and the robot turns to face East, the gun will turn with the robot and continue to point straight ahead, which is now East). If you don’t want that behavior (i.e. the robot turns to the east but the gun continues facing North), add these lines at the top of your run() method:
setAdjustRadarForRobotTurn(true);
setAdjustGunForRobotTurn(true);
setAdjustRadarForGunTurn(true);
Fire Power
So now that we know how to shoot at robots, we should just spray the area with bullets, right? Well, yes and no. We haven’t discussed gun heat yet.
Your gun cannot fire unless it is cold. You can check your current gun heat at any time by calling the getGunHeat() function. All robots start the round with a gun heat of 3.0, and the gun cools at a rate of 0.1 per tick. This is why no robots fire at the very beginning of a match.
Every fired bullet adds to your gun heat by the following formula:
1.0 + (fire power / 5)
So you can see that after you fire, you will need to wait a bit before you can fire again. You will also need to determine how “hard” to shoot. In our robot, we were always using a fire power of 1. However, fire power can be anywhere between 0.1 and 3.0. The larger the fire power the slower the bullet will travel, however, the more damage it will do. Bullet damage is calculated as follows:
If the fire power is > 1:
(fire power * 4) + ((bulletPower – 1) * 2)
Otherwise:
fire power * 4
When you fire the bullet, your life goes down by the amount of fire power you selected. This can be dangerous if you are low on life (especially if you are not very accurate with your shots). However, if you hit another robot with your shot, you gain back life equal to 3 * the fire power! So a maximum force bullet costs your robot 3 energy to shoot, but causes 18 points of damage to an enemy robot and gains you back 9 energy on a successful hit. Compare that to a minimum power bullet which only costs 0.1 energy to fire, but also only causes 0.4 damage and gains you 0.3 life back on a hit. However, with a minimum bullet your gun is cool and ready to fire again much faster.
As you can see, selecting how much energy to use when firing becomes an important aspect of your robot.
So Much to Do, So Little Time
So we have to come up with a targeting strategy, and we know we need to come up with a strategy for determining fire power, but that’s not all! Even with the very best targeting strategy, your bot will lose without a good movement strategy!
You may have noticed that our bot moves in a very predictable way, which allows our buddy Walls to score a lot of hits on us. The best defense is to never get hit in the first place (and to be honest, Wall’s targeting is…not great). How could you improve our robot’s movement strategy to avoid getting hit?
Most of a good robot is targeting and movement, but there is one more key aspect which is radar strategy: superior battlefield information can often lead to victory. Can you think of a way to improve ours?
Don’t Forget About Melee
Once you have mastered the Walls opponent, don’t forget to compare your bot to some of the other sample robots. Different robots have different targeting and movement strategies, and you never know who you will face. Some robots are tuned to defeat some robots and do very poorly against other, sometimes simpler, bots. Can you find a way to make your bot more versatile?
There is another aspect to Robocode: the melee. This is when you have many robots competing at the same time! Try adding several robots to the battle and see how you stack up. Strategies that work well for 1v1 don’t always work well against a more crowded field. Can you find a way to do well at both?
Tips and Tricks
- In order to debug issues with your robot, it is useful to write statements to the log. During a battle, click on the name of your robot in the list on the right. Any messages you print using out.println will show up in this console window.
- Given the graphical nature of Robocode, sometimes log messages are not the most helpful way to debug your robot. If you override the public void onPaint(Graphics2D g) function in your robot, you can draw with the graphics object and it will be shown on the screen during the match! Make sure you click the “Paint” button on your robot’s console window to activate your robot’s painting.
- Finally, just a gotcha: velocity is negative if a robot is going backwards! Don’t forget to take this into account.
Additional Resources
There are tons and tons of pages out there with more information, including detailed descriptions of tried and true, championship-caliber targeting and movement strategies. Here are some extremely handy links:
