Roasted Veggies and Pasta with Homemade Pesto

The first Friday of the month is reserved for recipes. You can see additional First Friday Food posts here.

The Reason:

Homemade pesto is one of the greatest things our society has ever invented. It’s one of the best things about gardening: lots of excess basil means lots of pesto sitting in the freezer, waiting to be eaten.

As for the rest of it, well, it’s fast and easy, which is something you can never have too much of, especially with two small kids and a busy schedule.

Which is good, because this pasta is something I can never have too much of.

The Journey:

You can essentially roast any kind of veggies, but we pretty much always fall back on the same ones. So go with what you have, but this is a combination I can vouch for.

colorful vegetables
Assuming you’ve made the pesto ahead of time, then all  you’ve got to do is coarsely chop the veggies, roast them, make pasta, and then mix it all together. What could be easier than that?

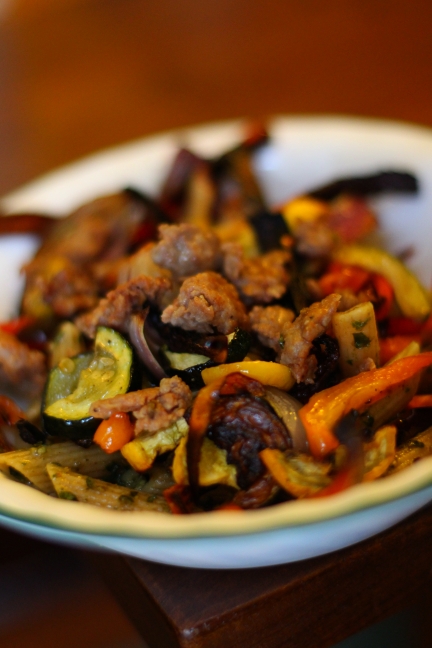
If you’re feeling particularly plucky, or carnivorous, you can toss in some sausage as well, which makes this even BETTER.

roasted veggies

The Verdict:

Not only is this absolutely delicious, but it’s just so colorful! Makes me feel good just looking at it. Plus you’re getting a lot of veggies, and it looks a lot fancier than it feels, since it’s so simple to make. The veggies are actually pretty sweet, and they go so well with the pesto. The sausage brings in a little saltiness and makes it last a bit longer in your stomach.

This is in heavy rotation at our house.

pasta and sausage

The Recipe:

Pesto:

Recipe modified slightly from the yummy life.

  • 4 cloves garlic
  • 4 cups fresh basil leaves
  • 1 cup grated Parmesan cheese
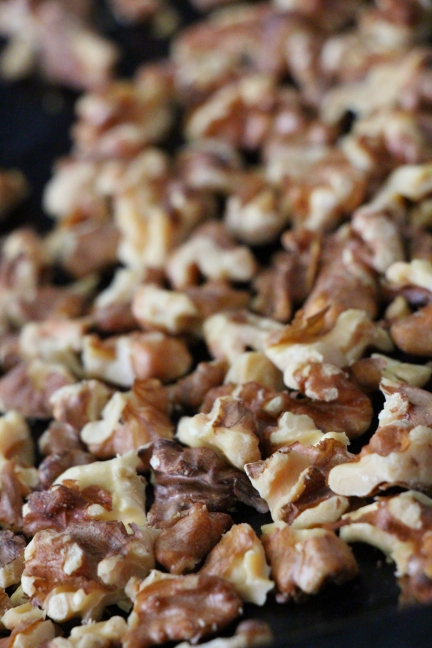
  • 2/3 cup toasted walnuts
  • 1 teaspoon kosher salt
  • 1 teaspoon ground black pepper
  • 2/3 cup extra-virgin olive oil plus enough to pour on top of the jars to prevent discoloration
  1. In a food processor, finely chop the garlic.
  2. Add basil leaves and chop until fine.
  3. Add cheese, walnuts, salt, and pepper; pulse until the consistency of a coarse paste.
  4. With the food processor running, slowly pour olive oil through the feed tube and continue mixing until the oil is completely combined with paste.
  5. Store in airtight container in refrigerator for up to one week. Pesto freezes well. Freeze in ice cube trays, and then store frozen pesto cubes in plastic freezer bags in freezer for up to 6 months. Pesto may also be frozen in small jars or plastic containers for up to 9-12 months.

Pasta:

  • Extra virgin olive oil
  • Salt
  • 1 package pasta
  • A handful of sun dried tomatoes (get the dry ones if you can, rather than the ones packed in oil)
  • ~ 1/2 lb of sausage (optional)

Any roasted veggies will do, but this is what we use:

  • 1-2 zucchini
  • 1 summer squash
  • 1 red pepper
  • 1 large red onion
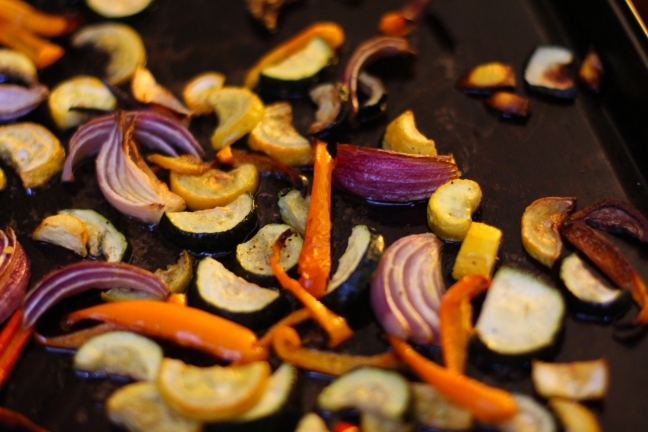
  1. Preheat the oven to 400
  2. Chop the veggies and spread them on a cookie sheet. Toss them with oil and a little salt
  3. Bake the veggies for 30-40 minutes, until they are a little blackened
  4. Make pasta as per directions on the package
  5. Toss the pasta with the pesto, veggies, sausage, and sun dried tomatoes

Unbelievable Kale Salad

The first Friday of the month is reserved for recipes. You can see additional First Friday Food posts here.

The Reason:

As I mentioned on my last kale recipe, we had a LOT of kale in the garden this year. It just kept going, and going, and going. As a result, we were on the hunt for as many new kale recipes as possible, and we had a lot of really good surprises.

This is one of them; it is one of the best salads I have ever had in my life.

The Journey:

I don’t think of this as being a particularly difficult thing to make, but I guess when it comes to salad, it’s a little more difficult than the average. The original recipe says you can skip some or all of the “optional” part. You cannot. I will not allow it.

walnuts

The nice thing is that there are a lot of different steps that don’t need to be done all at once. You can do the walnuts, go away for an hour, come back and do the raisins, wander away again, do breadcrumbs, etc. Also, you’re supposed to let it sit for awhile anyway, so no worries on making it ahead of time. We’ve even put the breadcrumbs in ahead of time, and they don’t seem to get soggy or suffer in any way.

toasted breadcrumbs

The Verdict:

I do not get sick of this salad. It’s got everything; it’s tasty, unique, healthy, has a good texture, the works. It’s one of the best things I know how to make. We’ve taken it as a dish to pass for Thanksgiving, a school potluck, and a New Year’s Eve party. I don’t know anybody who’s tried it and hasn’t liked it.

I should note that we substituted pepitas for the walnuts, since the school potluck was a nut-free event, and it was absolutely just as good.

Kale salad

The Recipe:

Recipe from Smitten Kitchen.

  • 1/2 cup walnut halves or pieces
  • 1/4 cup golden raisins
  • 1 tablespoon white wine vinegar (we use orange champagne vinegar)
  • 1 tablespoon water
  • 1/4 cup breadcrumbs
  • 1 tiny clove garlic, minced or pressed
  • Coarse or kosher salt
  • 3 tablespoons olive oil
  • 1 bunch kale, washed and patted dry
  • 2 ounces (1/2 cup) pecorino (or parmesan) cheese, grated
  • Juice of half a lemon
  • Freshly ground black pepper or red pepper flakes, to taste
  1. Heat oven to 350.
  2. Toast walnuts on a baking sheet for 10 minutes, tossing once. Let cool and coarsely chop.
  3. In a small saucepan over low heat, simmer white wine vinegar, water and raisins for 5 minutes, until plump and soft. Set aside in liquid.
  4. Toast bread crumbs, garlic and 2 teaspoons of the olive oil in a skillet together with a pinch of salt until golden. Set aside.
  5. Trim heavy stems off kale and remove ribs. Cut kale into very thin ribbons crosswise and put in a large bowl.
  6. Add pecorino, walnuts and raisins (including all of the vinegar mixture), remaining 2 tablespoons olive oil and lemon juice and toss until all the kale ribbons are coated.
  7. Add salt and pepper to taste.
  8. Let sit for 10 minutes before serving, if you can, as it helps the ingredients come together.
  9. Just before serving, toss with breadcrumbs.

Kale and Black Bean Tacos

The first Friday of the month is reserved for recipes. You can see additional First Friday Food posts here.

The Reason:

Kale. Lots and lots and lots of kale. The garden produced more kale than we knew what to do with this year, and we had to find some way to use it. This was one of the pleasant surprises turned up by kale recipe Internet searches.

The Journey:

As with all kale recipes, de-stemming and chopping is the hardest part. I’m not particularly stringent on the de-stemming part, but I do try to take out the largest parts. It also helps to employ child labor.

November2 004

I would say this doesn’t taste particularly “kale-y”, but is just a fantastically seasoned topping for your tacos. It’s not just a good excuse to use kale; I’d choose it over regular lettuce any day. In fact I’ve eaten the leftover greens just as a salad. Don’t judge until you’ve tried it.

November2 010

The Verdict:

Soooooo good! SO good.

The citrus is what really puts it over the top, I think. Also, I think I tend to under-season tacos and then just depend on some salsa to give it a little kick. But the seasoning is so good here. Finally, the corn tortillas are the finishing touch. We usually have flour tortillas, but corn tortillas taste so much more authentic to me. (It helps that we have an awesome local tortilla company here!)

November2 017

The Recipe:

Recipe “upsized” from Cookie and Kate:

  • The juice from 1 lime (I mostly use lemon)
  • 1 Tablespoon of olive oil
  • 1/4 tsp of cumin powder
  • 1/2 tsp chili powder
  • 1/2 tsp of sea salt
  • 1 seeded and finely chopped fresh jalapeños
  • 1 tablespoon cilantro, roughly chopped
  • 1 bunch of kale (~8 – 10 leaves), washed and dried, stems removed and roughly chopped into bite-sized pieces
  • 4 garlic cloves, minced
  • 2 cans black beans, rinsed and drained
  • ~8 small (8 inch) corn tortillas
  • 1 small avocado, pitted and sliced into strips lengthwise
  • 1/4 cup chopped red onion
  • crumbled feta cheese for topping
  1. In a bowl, combine the lime juice, olive oil, cumin, chili powder, sea salt, jalapeño, cilantro and kale. Toss to mix well and set the bowl aside to marinate.
  2. Warm the beans and minced garlic with a couple of tablespoons of water. You can do this in your smallest sauce pan on the stove over medium-low heat (sauté the garlic in a drizzle of olive oil before adding the beans) or in a bowl in the microwave. Add little splashes of water as necessary. Use a fork to mash up the beans a little and add salt to taste, if necessary.
  3. Warm the tortilla in a skillet or in the microwave for a few seconds. Top the tortilla with the black bean mixture, sliced avocado, marinated kale (you may end up with more kale than will fit in your burrito, reserve the extra and serve it on the side). Top with red onion and feta. Roll up the burrito by first folding the tortilla over from the bottom to partially cover the beans and greens, then fold in the 2 sides; finish rolling and put the burrito seam side down on a plate. Slice in half, if desired, and serve with sour cream or plain Greek yogurt on the side if you’d like.

Crusted Salmon with Honey-Mustard Sauce

The first Friday of the month is reserved for recipes. You can see additional First Friday Food posts here.

The Reason:

Apropos of our Maine vacation, how about a seafood recipe?

Sara is not a fan of seafood. I don’t remember how I convinced her to try this one, but she actually doesn’t mind it. So if an avid seafood avoider like Sara likes it, then you know it’s good.

The Journey:

You start out by soaking the salmon in milk. This seemed weird at first, but I think it really takes a lot of the “fishy” taste out of it, which is what makes it appealing to non-fish lovers.

2013_04_05_9883

You know, I think I’d basically eat anything, as long as it is crusted. You put some parmesan and bread crumbs on there, and everything is instantly better.

2013_04_05_9886

The honey mustard is very buttery, but actually I think that’s what makes it work. I don’t know if I would eat this honey mustard on a salad, but as someone who just got back from Maine (where you practically drink a cup of butter with your lobster), I think I can safely say that butter is always good with seafood.

2013_04_05_9888

The Verdict:

Not just tasty, but very, very easy to make. Very little prep time, and wonderful. Don’t skip on the honey mustard though; that’s what totally makes it.

2013_04_05_9892

The Recipe:

Recipes from allrecipes.com:

  • 1 (1.5 pound) skinless center-cut salmon fillet, cut into 4 pieces
  • 1 cup milk
  • 1/4 cup whole wheat panko bread crumbs
  • 2 tablespoons grated Parmesan cheese
  • 1 egg
  • 2 tablespoons butter, melted
  • 1 tablespoon whole grain mustard
  • 1 tablespoon honey
  1. Preheat an oven to 375 degrees F (190 degrees C). Prepare a baking sheet with cooking spray.
  2. Place the salmon fillets in a baking dish; pour the milk over the fillets. Allow the salmon to soak in the milk 10 to 15 minutes.
  3. Stir the bread crumbs and Parmesan cheese together in a wide, deep bowl. Beat the egg in a separate bowl until frothy. Remove the salmon fillets from the milk; shake the excess milk off the fish. Dip each fillet into the beaten egg and then gently press into the bread crumb mixture to coat; gently shake to remove the excess.
  4. Bake in the preheated oven, turning once, until the salmon flakes easily with a fork, about 15 minutes.
  5. While the salmon bakes, stir the butter, mustard, and honey together in a bowl; drizzle over the baked salmon to serve.

The Best Chocolate Cake

The first Friday of the month is reserved for recipes. You can see additional First Friday Food posts here.

The Reason:

The original reason we found this recipe was that Sara was looking for a cake recipe for Ollie’s birthday. But since that time we’ve made it over and over and over again, because it is unbelievably good. I mean, as a rule, chocolate cake is good, right? Well, this one is better.

The Journey:

Oliver had some very specific ideas about what his birthday cake, specifically demanding an “Easter” birthday cake. After finding this recipe, Sara wanted to put chocolate frosting on it, and Ollie declared, “Then I won’t eat it!”

The simple solution was just to make many cakes.

2013_04_21_9975

We made this one in a bundt pan, and the cake is basically a giant chocolate doughnut. Or, as Ollie puts it, an “O for Ollie”.

2013_04_21_9980

You’ll notice this post has a lot more pictures than an average food post, because this cake is so delicious that even the pictures themselves are delicious. I can’t stop taking pictures of it, or staring at them, or licking my screen. I defy you to look at this without your tummy rumbling:

2013_04_21_9978

The Verdict:

I mean, come on. At this point, what do I really have to tell you?

However, I did mention that it was very versatile. Here is a picture of Ollie’s beloved 3rd birthday “Easter” cake:

2013_04_13_9933

But it works as a regular cake too, and is just as delicious.

2013_06_01_9999_8

The Recipe:

Cake recipe adapted from Smitten Kitchen.

  • 1/2 cup (1 stick) unsalted butter, softened
  • 1/2 cup firmly packed light brown sugar
  • 1/2 cup granulated sugar
  • 1 large egg, at room temperature
  • 1 cup whole milk yogurt
  • 1 teaspoon vanilla extract
  • 1 1/2 cups white whole wheat flour
  • 3/4 cup cocoa powder
  • 1/2 teaspoon baking soda
  • 1/8 teaspoon salt

(Note that we doubled the above recipe to make the cake in a bundt pan)

  1. Preheat the oven to 325°F.
  2. Butter and lightly flour a 9x5x3-inch loaf pan, or spray it with a butter-flour spray.
  3. In a large bowl, on the medium speed of an electric mixer, cream the butter until smooth.
  4. Add the sugars and beat until fluffy, about 3 minutes.
  5. Add the egg and beat well, then the buttermilk and vanilla. Don’t worry if the batter looks a little uneven.
  6. Sift the flour, cocoa, baking soda, and salt together right into your wet ingredients. Stir together with a spoon until well-blended but do not overmix. Scrape down the batter in the bowl, making sure the ingredients are well blended.
  7. Pour the batter into the prepared pan.
  8. Bake for 60 to 70 minutes (It took us about 70 – 75 minutes for a bundt pan), or until a cake tester inserted into the center of the loaf comes out clean.
  9. Cool in pan on a rack for about 10 to 15 minutes, at which point you can cool it the rest of the way out of the pan.

Frosting recipe also from Smitten Kitchen (different recipe!)

  • 6 ounces good semisweet chocolate chips
  • 6 tablespoons heavy cream
  • 3/4 teaspoon instant coffee granules
  1. Melt the chocolate, heavy cream, and coffee in the top of a double boiler over simmering water until smooth and warm, stirring occasionally.
  2. Drizzle over the top of cooled cake.