Best. Broccoli. Ever.

The first Friday of the month is reserved for recipes. You can see additional First Friday Food posts here.

The Reason:

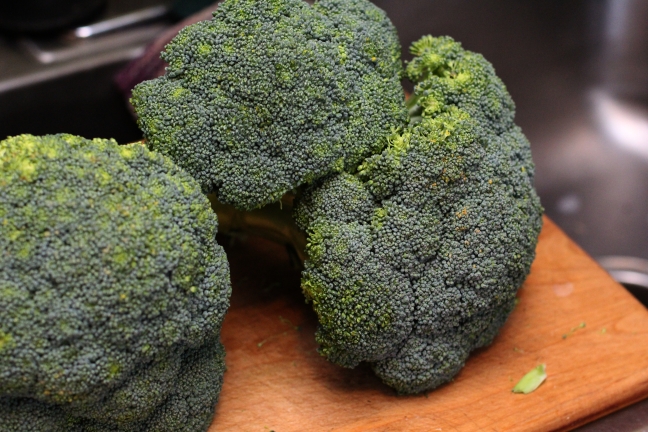
I’m not sure how Sara happened on this recipe to begin with, but it’s definitely THE way to prepare broccoli. The first time we made it, it almost got eaten before even landing on the table. There are never any leftovers.

The Journey:

This has been a slowly evolving recipe.

The original recipe was just for the broccoli, which was amazing enough, and we couldn’t get enough of it. However, we don’t really eat a lot of side dishes on a regular basis. On an average night I’m willing to put some effort in on an amazing main dish, but I don’t have the energy left over to put work into sides as well. Maybe some reheated corn and that’s about it.

broccoli

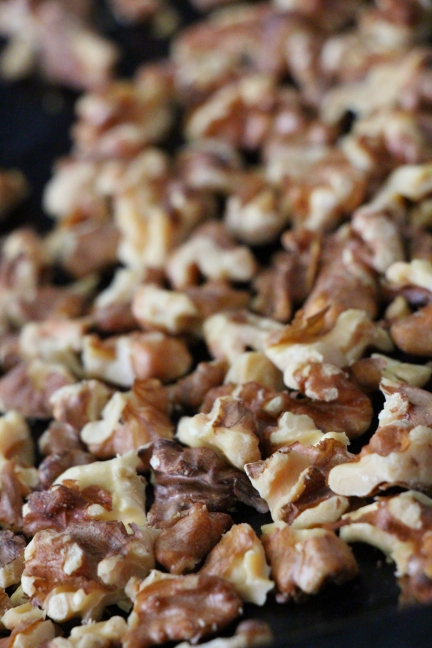
However, one day Sara sort of smashed it into a pasta recipe and it really became one of our go-to meals. Just the broccoli as-is with pasta is awesome enough, but then you throw in some roasted walnuts and crushed red pepper (which kind of goes with everything, no?) and you’ve got something *amazing*. Plus the walnuts give it a little more staying power.

spicy broccoli


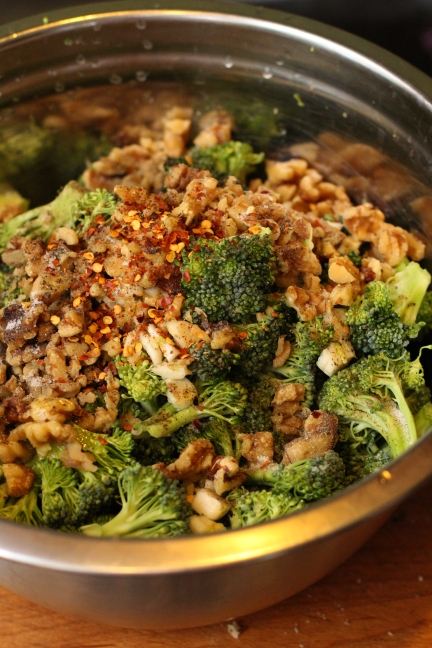
The broccoli is best when it has little blackened spots on it. It’s not burned, I promise! Also, go with the fresh shredded parmesan. For some reason, on this recipe in particular, it really makes a world of difference.

roasting broccoli

The Verdict:

Honestly, it’s hard to get something this delicious that is healthier than this. What more could you ask for? If you can manage to fend off the savages long enough, it’s great as a left-over as well.

healthy pasta

The Recipe:

As a meal:

Recipe inspired by Real Simple.

  • 1 package whole wheat pasta (we usually use spirals)
  • 2 bunches of broccoli
  • 2/3 cup walnuts
  • 2 Tablespoons extra virgin olive oil
  • 4 cloves of garlic
  • 1/2 teaspoon salt
  • 1/2 teaspoon pepper
  • 1/2 teaspoon crushed red pepper
  • 2 to 3 Tablespoons of butter (to taste)
  • juice of 1/2 lemon
  • 1/2 cup freshly grated parmesan cheese
  1. Preheat the oven to 400
  2. Cook the pasta according to the package directions. Reserve 1 1/2 cups of the cooking liquid. Drain the pasta and return it to the pot.
  3. Meanwhile, on 2 rimmed baking sheets, toss the broccoli, walnuts, oil, garlic, 1/2 teaspoon salt, 1/2 teaspoon pepper, and 1/2 teaspoon crushed red pepper
  4. Roast until the broccoli is tender and slightly browned, 20 – 25 minutes
  5. Toss the pasta with the broccoli mixture, butter, and 1/2 cup of the reserved pasta water
  6. Sprinkle with the parmesan & lemon juice before serving

As a side dish:

Recipe from Farmish Mama.

  • 2 bunches of broccoli
  • 3 or 4 cloves of garlic
  • ~1 tablespoon of lemon juice (about half a lemon, lightly squeezed)
  • Freshly grated parmesan cheese
  1. Preheat the oven to 425
  2. Cut broccoli into bite-sized florets
  3. Slice garlic and toss in a bowl with the broccoli
  4. Toss the broccoli and sliced garlic with the olive oil and season with salt
  5. Spread it all out on a baking tray making sure they aren’t touching and let it roast 20 – 25 minutes or until you get lots of nice brown roasty spots
  6. Take it out of the oven and squeeze a lemon all over the broccoli and grate some good quality, fresh parmesan cheese all over it

Roasted Veggies and Pasta with Homemade Pesto

The first Friday of the month is reserved for recipes. You can see additional First Friday Food posts here.

The Reason:

Homemade pesto is one of the greatest things our society has ever invented. It’s one of the best things about gardening: lots of excess basil means lots of pesto sitting in the freezer, waiting to be eaten.

As for the rest of it, well, it’s fast and easy, which is something you can never have too much of, especially with two small kids and a busy schedule.

Which is good, because this pasta is something I can never have too much of.

The Journey:

You can essentially roast any kind of veggies, but we pretty much always fall back on the same ones. So go with what you have, but this is a combination I can vouch for.

colorful vegetables
Assuming you’ve made the pesto ahead of time, then all  you’ve got to do is coarsely chop the veggies, roast them, make pasta, and then mix it all together. What could be easier than that?

If you’re feeling particularly plucky, or carnivorous, you can toss in some sausage as well, which makes this even BETTER.

roasted veggies

The Verdict:

Not only is this absolutely delicious, but it’s just so colorful! Makes me feel good just looking at it. Plus you’re getting a lot of veggies, and it looks a lot fancier than it feels, since it’s so simple to make. The veggies are actually pretty sweet, and they go so well with the pesto. The sausage brings in a little saltiness and makes it last a bit longer in your stomach.

This is in heavy rotation at our house.

pasta and sausage

The Recipe:

Pesto:

Recipe modified slightly from the yummy life.

  • 4 cloves garlic
  • 4 cups fresh basil leaves
  • 1 cup grated Parmesan cheese
  • 2/3 cup toasted walnuts
  • 1 teaspoon kosher salt
  • 1 teaspoon ground black pepper
  • 2/3 cup extra-virgin olive oil plus enough to pour on top of the jars to prevent discoloration
  1. In a food processor, finely chop the garlic.
  2. Add basil leaves and chop until fine.
  3. Add cheese, walnuts, salt, and pepper; pulse until the consistency of a coarse paste.
  4. With the food processor running, slowly pour olive oil through the feed tube and continue mixing until the oil is completely combined with paste.
  5. Store in airtight container in refrigerator for up to one week. Pesto freezes well. Freeze in ice cube trays, and then store frozen pesto cubes in plastic freezer bags in freezer for up to 6 months. Pesto may also be frozen in small jars or plastic containers for up to 9-12 months.

Pasta:

  • Extra virgin olive oil
  • Salt
  • 1 package pasta
  • A handful of sun dried tomatoes (get the dry ones if you can, rather than the ones packed in oil)
  • ~ 1/2 lb of sausage (optional)

Any roasted veggies will do, but this is what we use:

  • 1-2 zucchini
  • 1 summer squash
  • 1 red pepper
  • 1 large red onion
  1. Preheat the oven to 400
  2. Chop the veggies and spread them on a cookie sheet. Toss them with oil and a little salt
  3. Bake the veggies for 30-40 minutes, until they are a little blackened
  4. Make pasta as per directions on the package
  5. Toss the pasta with the pesto, veggies, sausage, and sun dried tomatoes

Authentic Refried Beans

The first Friday of the month is reserved for recipes. You can see additional First Friday Food posts here.

The Reason:

I love Rick Bayless. I am on the record about this. As such, we own a well-worn copy of Rick Bayless’s Mexican Kitchen. I’ve previously blogged a recipe from there, Tamal Azteca with Quick-Cooked Tomato-Chipotle Sauce.

So I think we originally just looked up this recipe as a generic side dish for mexican food, before realizing it’s so much more than that.

The Journey:

I’m known to eat a little bacon here and there. At some point, I realized there was no reason to throw away all that “liquid gold” bacon grease, and started saving it for cooking. The best use for bacon grease is refried beans, but it also works well for frying pancakes!

IMG_2403

This recipe is so simple, that I almost feel bad calling it a recipe. Beans, onions, garlic. What’s the big deal? Well, you eat it and you tell me.

frying onions

I never would have considered refried beans a health food, but making them from scratch like this, they’re not so bad. Beans, onions, garlic. (And a good thing too, since you’ll be wolfing them down by the spoonful!)

pinto beans

The Verdict:

If you have eaten at our house, there’s a good chance we have tried to feed these to you. I swear to you, I didn’t know that refried beans could possibly taste this good. It actually makes me sad that so many people will never experience how awesome these are, and just continue to think of refried beans as that brownish paste from a can that Taco Bell uses to glue the soft taco to the crunchy taco.

refried beans

The Recipe:

Recipe from Rick Bayless’s Mexican Kitchen.

  • 2 Tablespoons bacon grease
  • 1 medium white onion, chopped
  • 4 garlic cloves, finely chopped
  • 4 cups undrained, seasoned cooked beans
  • Salt
  1. Heat the bacon grease in a large pan.
  2. Add the onion and cook, stirring frequently, until deep golden, about 10 minutes
  3. Str in the garlic, cook for a minute or so.
  4. Add in about 1/4 of the beans, leaving most of the liquid behind.
  5. With a potato masher, mash the beans into a coarse puree. Add another portion of the beans, and mash. Continue until all the beans have been added.
  6. Add about a cup of bean liquid and stir frequently over the heat until the beans are still a little soupier than you’d like to serve them (they’ll thicken as they sit).
  7. Salt to taste.

Oatmeal-Yogurt Pancakes with Blackberry Crush

The first Friday of the month is reserved for recipes. You can see additional First Friday Food posts here.

The Reason:

Pancakes.

Also, if you’re some kind of crazy person and you need a second reason, I just so happened to stumble across this recipe on the day we had bought some random blackberries for no reason at all.

Kismet.

Pancake kismet (the only kind I’m interested in).

The Journey:

The thing that originally piqued my interest was the oats. It turns out, they just sort of disappear into it; you really can’t tell they’re in there. So it’s a great way to include something a little different than your standard flour.

blackberry pancakes

They have yogurt in them too, and since I absolutely love the Russian yogurt pancakes, that was a draw. The nice thing about this one, though, is that it uses a lot less yogurt. We often don’t have enough yogurt on hand to do the yogurt pancakes.

Plus the fruit topping, although you could really put that on any kind of pancakes. The first time we made it we also had homemade whipped cream, which really was the magnum opus of pancakes. (Obviously, it works with strawberries as well as blackberries.)

cooking strawberries

The Verdict:

These are my current favorite pancake. I think we made them 4 weeks in a row. I cannot overstate how delicious and wonderful they are.

I keep meaning to reduce the butter, but somehow I never quite get around to it…

strawberry pancakes

The Recipe:

Recipe from the Whole Grains Council:

For the Blackberry Crush:

  • 2 cups fresh blackberries (or other fruit)
  • 1/4 cup turbinado sugar
  • 1/4 cup maple syrup

For the Pancakes:

  • 1 2/3 cups white whole-wheat flour
  • 2/3 cup old-fashioned rolled oats
  • 2 tbsp granulated sugar
  • 1 1/4 tsp baking powder
  • 1/4 heaping tsp baking soda of soda
  • 1/4 tsp salt
  • 1 cup Greek yogurt, plus more for garnish
  • 1 cup whole milk
  • 4 tbsp unsalted butter, melted, plus more for the pan
  • 2 large eggs

To make the Blackberry Crush:

  1. Combine the blackberries and sugar in a medium bowl and mash slightly with a fork.
  2. Strain the juice into a small pot and reserve the berries.
  3. Heat the juice over medium heat and simmer until it is thick, syrupy, and easily coats the back of the spoon, about 8 minutes.
  4. Remove from the heat and stir in the maple syrup. Cool slightly, and pour over the berries. Adjust the sweetness with additional maple syrup if needed. Set the syrup aside.

To make the pancakes:

  1. Whisk together flour, oats, sugar, baking powder, baking soda, and salt in a large bowl.
  2. In a separate bowl, whisk together the yogurt, milk, the melted butter, and eggs. Make a well in the center of the dry ingredients, and whisk in the wet ingredients until well incorporated. The batter should be thick, with little tiny bubbles on the surface.

Unbelievable Kale Salad

The first Friday of the month is reserved for recipes. You can see additional First Friday Food posts here.

The Reason:

As I mentioned on my last kale recipe, we had a LOT of kale in the garden this year. It just kept going, and going, and going. As a result, we were on the hunt for as many new kale recipes as possible, and we had a lot of really good surprises.

This is one of them; it is one of the best salads I have ever had in my life.

The Journey:

I don’t think of this as being a particularly difficult thing to make, but I guess when it comes to salad, it’s a little more difficult than the average. The original recipe says you can skip some or all of the “optional” part. You cannot. I will not allow it.

walnuts

The nice thing is that there are a lot of different steps that don’t need to be done all at once. You can do the walnuts, go away for an hour, come back and do the raisins, wander away again, do breadcrumbs, etc. Also, you’re supposed to let it sit for awhile anyway, so no worries on making it ahead of time. We’ve even put the breadcrumbs in ahead of time, and they don’t seem to get soggy or suffer in any way.

toasted breadcrumbs

The Verdict:

I do not get sick of this salad. It’s got everything; it’s tasty, unique, healthy, has a good texture, the works. It’s one of the best things I know how to make. We’ve taken it as a dish to pass for Thanksgiving, a school potluck, and a New Year’s Eve party. I don’t know anybody who’s tried it and hasn’t liked it.

I should note that we substituted pepitas for the walnuts, since the school potluck was a nut-free event, and it was absolutely just as good.

Kale salad

The Recipe:

Recipe from Smitten Kitchen.

  • 1/2 cup walnut halves or pieces
  • 1/4 cup golden raisins
  • 1 tablespoon white wine vinegar (we use orange champagne vinegar)
  • 1 tablespoon water
  • 1/4 cup breadcrumbs
  • 1 tiny clove garlic, minced or pressed
  • Coarse or kosher salt
  • 3 tablespoons olive oil
  • 1 bunch kale, washed and patted dry
  • 2 ounces (1/2 cup) pecorino (or parmesan) cheese, grated
  • Juice of half a lemon
  • Freshly ground black pepper or red pepper flakes, to taste
  1. Heat oven to 350.
  2. Toast walnuts on a baking sheet for 10 minutes, tossing once. Let cool and coarsely chop.
  3. In a small saucepan over low heat, simmer white wine vinegar, water and raisins for 5 minutes, until plump and soft. Set aside in liquid.
  4. Toast bread crumbs, garlic and 2 teaspoons of the olive oil in a skillet together with a pinch of salt until golden. Set aside.
  5. Trim heavy stems off kale and remove ribs. Cut kale into very thin ribbons crosswise and put in a large bowl.
  6. Add pecorino, walnuts and raisins (including all of the vinegar mixture), remaining 2 tablespoons olive oil and lemon juice and toss until all the kale ribbons are coated.
  7. Add salt and pepper to taste.
  8. Let sit for 10 minutes before serving, if you can, as it helps the ingredients come together.
  9. Just before serving, toss with breadcrumbs.