Grilled Lemon-Thyme Chicken

The first Friday of the month is reserved for recipes. You can see additional First Friday Food posts here.

The Reason:

I can’t believe that we’re already into August. Summer just started, and yet here we are, in the dog days. How can this have happened??

I have a nice fall recipe all lined up for next month, but I refuse to let summer go without a fight, so here is the most summer-iest, summer recipe I have.

The Journey:

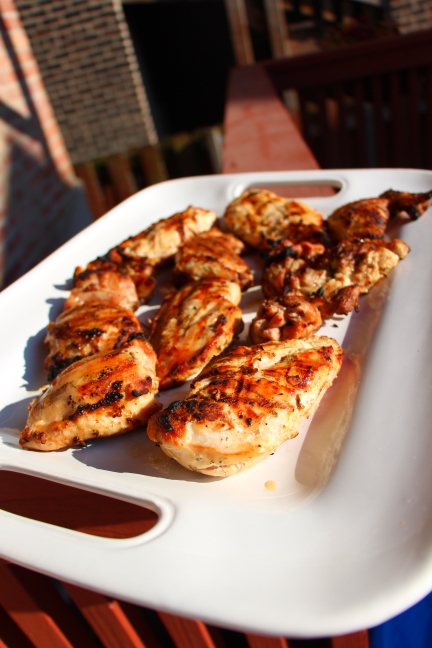
The original recipe called for oregano, and I don’t really remember how we ended up using thyme instead, but it is absolutely the way to go. I will grant you that it is a real pain in the rear to try to get all those tiny leaves off the stems and chopped up, but it is absolutely worth it.

2017_07_08_3223

The way these things smell on the grill… It is summer personified. It smells like one of those late-summer, outdoor festivals, where you’ve been baking in the sun, surrounded by family, and there’s some kind of food tent where they’ve got one of those enormous, six foot long grills sizzling away. And you’re just kind of standing around with a cold drink in your hand, maybe listening to a band play or playing bags.

This is the smell that that grill is making, and thyme is the secret ingredient.

2017_07_08_3228

The Verdict:

This is one of those recipes that we have been making since forever, and I always go, “How has that never been on the blog before?” Seems inconceivable.

Make this one before the summer is over, and thank me later.

2017_07_08_3232

The Recipe:

Recipe slightly modified from Bon Appetit.

  • 2 tablespoons fresh lemon juice
  • 2 tablespoons coarsely chopped fresh thyme (or oregano, as per the original recipe)
  • 2 garlic cloves, pressed
  • 1 tablespoon extra-virgin olive oil
  • 1 1/2 teaspoons coarse kosher salt
  • 1 teaspoon finely grated lemon peel
  • ~8 pieces of chicken
  1. Whisk first 6 ingredients in small bowl. Season to taste with freshly ground black pepper.
  2. Marinate at room temperature 30 minutes or in refrigerator up to 2 days, turning occasionally.
  3. Prepare barbecue (medium-high heat). Place chicken, with some marinade still clinging, on grill rack; grill chicken until cooked through and golden brown on all sides, turning frequently, about 30 minutes.
  4. Transfer to plates and serve.

Herbed Bread

The first Friday of the month is reserved for recipes. You can see additional First Friday Food posts here.

The Reason:

This is the king of garlic breads. I have never tasted any other garlic bread with quite this combination of flavors. I could eat a whole loaf of this (and as a teenager, basically did).

2016_03_27_0602

The Journey:

When I was in about 1st grade, someone brought this bread to school. My memory is a bit hazy on this, but I loved it SO MUCH, that I got them to give me the recipe.

This was before there was any such thing as “the Internet” where you can just “look up recipes” when you’re hungry, but despite living in this vast, unknowable future, I still make this bread from a recipe card written out in my mom’s handwriting like it’s the 1600s (note: I do not churn my own butter).

2016_03_27_0593

The trick is to butter BOTH SIDES OF THE BREAD. Even if your wife is like, “Why does this take so much butter? Couldn’t you cut down on the butter a little bit?” You shout “Shut your mouth, hypothetical wife in this entirely hypothetical situation!” and then you just go ahead and make it with all the butter and hypothetically tell her you cut down on the butter even though you really didn’t.

(Either that, or you just cut down on the butter like she said and complain bitterly with every piece how there’s not going to be enough butter. Hypothetically.)

2016_03_27_0597

The Verdict:

This is one of my all time favorite things to eat in the world, and I always requested it for my “birthday dinner” when I was a kid (along with lasagna). I could absolutely just eat a loaf of this as a meal, and I am very happy to finally share it with all of you.

2016_03_27_0608

The Recipe:

Recipe from some kid in my 1st grade class.

  • 1 loaf Italian bread (whole wheat if you can get it)
  • 1/2 cup soft butter
  • 1 tsp. parsley flakes, plus more for topping
  • 1/4 tsp. dried oregano
  • 1/4 tsp dill weed
  • 1 clove garlic, minced, OR 1/4 tsp. garlic powder
  • grated Parmesan cheese for topping
  1. Preheat oven to 400.
  2. Cut loaf into approximately 1 inch slices and place on aluminum foil.
  3. Blend butter, parsley, oregano, dill and garlic.
  4. Spread on both sides of each slice, and spread any remaining mixture on the top
  5. Twist ends of aluminum foil, but leave the top open
  6. Top liberally with Parmesan cheese and parsley flakes
  7. Bake 10 minutes.

Apple Baked French Toast

The first Friday of the month is reserved for recipes. You can see additional First Friday Food posts here.

The Reason:

This is something of an old family recipe, and I am tired of always trying to find it online. Saving here for posterity.

My mom has always made apple baked french toast. It was always a kind of “special occasion” breakfast, but we particularly like to have it on Christmas morning. We prepare it the night before, and then when we get up, we start the oven preheating. We pop it in the oven, and it’s ready to go right about when we finish opening presents!

The Journey:

This is not actually my mom’s recipe; this is just a modified version of one that we found on the Internet. It must be pretty similar. Mom, care to comment?

One thing I would recommend is using bread that is a bit drier, like a baguette or something a little crustier, to soak up some of the egg-liquid.

2015_12_24_2578

All recipes say to peel the apples, but I’m way too lazy for that. I honestly don’t think you need to (apple peels get pretty soft when you cook them), but that’s up to you I guess.

2015_12_24_2581

However, we do have a bit of mitigating circumstances.

Usually when my mom makes it, she uses her “apple peeler-corer-slicer” to peel and cut the apples:

We don’t have one of those. However, as you may know, we have a family tradition of making applesauce every year. Lucky for me, Mom and Ron usually also can cut up apples and give them to us for Christmas, which means we have a supply of already-peeled-and-cut apples, which makes this pretty easy. One jar is not quite enough for a batch of apple baked french toast, so we cut up 3 or 4 apples in addition.

2015_12_24_2584

The Verdict:

Well, it should be pretty obvious at this point that I recommend this one. It’s great for when you have guests, by itself, with syrup, or with whipped cream on top.

2015_12_25_2608

The Recipe:

Recipe inspired by King Arthur Flour:

  • 1 baguette, about 18″ to 20″ long
  • 8 large eggs
  • 2 cups milk
  • 1/4 cup granulated sugar
  • 1 tablespoon vanilla
  • 1/4 teaspoon ground nutmeg
  • 2 dashes cloves
  • 1/4 teaspoon salt (skip if bread is salty)

Topping:

  • 1 jar of canned apples + 3 or 4 apples thinly sliced (~6 large apples if not using canned)
  • 1/4 cup brown sugar
  • 1 teaspoon ground cinnamon
  • pinch of salt
  • 2 tablespoons melted butter
  • Optional: 1/2 – 3/4 cup walnuts or pecans
  1. Lightly butter a 10″ x 15″ baking pan or similar-sized casserole dish.
  2. Slice a crusty loaf of bread into 1″ slices. Place the slices of bread into the pan.
  3. In a medium-sized bowl beat the eggs, then whisk in the milk, sugar, vanilla, nutmeg, cloves, and salt.
  4. Pour this mixture over the bread, and let it soak in while you’re preparing the topping.
  5. Peel and slice the apples thinly. Toss them with the remaining topping ingredients, and spread them over the bread in the pan.
  6. To bake immediately, preheat the oven to 375°F. To bake up to 48 hours later, cover the pan, and refrigerate.
  7. NOTE: we cover with tinfoil to avoid burning the top
  8. Bake the French toast in a preheated 375°F oven for 30 to 40 minutes, until the apples are soft and the eggs set. If it’s been refrigerated, remove the cover, and bake for 60 to 70 minutes.
  9. NOTE: We always, always do it cold. We put it in the oven while it is preheating, so the glass pan doesn’t break due to temperature shock, and set the timer for 80 minutes.

Seltzer Water Pancakes

The first Friday of the month is reserved for recipes. You can see additional First Friday Food posts here.

The Reason:

My brother mentioned making pancakes that used the fizziness of seltzer to help them rise, which I had never heard of. And, well, I like pancakes, so.

2015_05_17_1788

The Journey:

I don’t think you really need a mixer to make pancakes. It is debateable whether it’s worth it at all, since I need to dirty a spoon for dropping them on the pan anyway. On the other hand, this stand mixer just sits there on the counter taking up space and demanding to be used to justify its existence, so why not?

Plus, it’s purty in pictures.

2015_05_17_1789

The seltzer was indeed quite dramatic, with all the fizzing. I would imagine that kids would find this fun, or else just showing off in front of people. “And now, the secret ingredient!” you proclaim with a flourish, making a bubbly pancake volcano.

But mostly it’s just me in the kitchen, making volcanoes by myself, so much of the effect is wasted.

2015_05_17_1792

The Verdict:

I gotta be honest: they were okay, but nothing special. They’re very, very similar to the Oatmeal-Yogurt Pancakes. The seltzer water, though dramatic, didn’t really make that much of a difference over traditional methods as far as fluffiness of the pancakes. There was nothing wrong with them, but since we don’t keep seltzer water in the house I probably won’t make these again.

2015_05_17_1802

The Recipe:

Recipe from I Heart Eating:

  • 2 c. all-purpose flour
  • 2 T. granulated sugar
  • 1/2 tsp. salt
  • 1 c. plain yogurt
  • 2 tsp. baking soda
  • 1 1/3 c. sparkling seltzer water
  • 2 eggs, lightly beaten
  • Butter
  1. In a large bowl, sift together the flour, sugar, and salt.
  2. In a separate small bowl, stir together the yogurt and baking soda; let sit for 10 minutes.
  3. Add the yogurt mixture, seltzer, and eggs to the flour mixture; whisk until just combined.
  4. Let batter rest for 10 minutes.
  5. Meanwhile, heat butter in a skillet or on a griddle over medium heat.
  6. Scoop about 1/4 cup of batter onto skillet, gently spreading out each portion of batter.
  7. Cook pancakes until bubbles begin to form around edges, about 2 minutes.
  8. Flip each pancake with a spatula, and cook until golden brown, about 2 minutes more.
  9. Repeat with remaining batter, re-buttering skillet as needed.

Cinnamon Plum Cake

The first Friday of the month is reserved for recipes. You can see additional First Friday Food posts here.

The Reason:

I don’t remember if we made this the first time because we had plums, or if we bought plums to make it. But I can definitely tell you the second time, we definitely bought plums to make it.

I had another recipe for this week, but I was hoping to get this one out before the plums were completely done for the season!

2015_09_19_2320

The Journey:

I’m kind of ambivalent towards plums. I’ve got nothing against them, but I don’t usually feel like sitting down and just eating a plum, you know? HOWEVER, it turns out that if you put them in a CAKE, that’s a whole different story.

2015_09_19_2325

So, this recipe calls for 1 tablespoon of cinnamon, which is sort of an unprecedented amount of cinnamon. You may think that’s a typo, and it is. Kind of. From Smitten Kitchen:

I received a note from Amanda Hesser over the weekend giving me a heads-up that the 1 tablespoon listed in the Essential New York Times Cookbook was actually a typo, and should have been 1 teaspoon. In fact, the very original version in the Times had 1 tablespoon too, but all of the future ones had only 1 teaspoon, suggesting that it had been a typo there too.

Having made the 1 tablespoon version (repeatedly), I can tell you that I wouldn’t have it any other way. It is a lot of cinnamon, and I wouldn’t have thought cinnamon + plums = magic, but in fact, cinnamon + plums = magic.

2015_09_19_2326The Verdict:

I feel like this is a fancy-pants dessert that you could impress with at a party, and yet it is so delicious and easy to make, so you won’t mind just making it for yourself at home.

It is also the only dessert I know where you can literally PUT IN YOUR THUMB AND PULL OUT A PLUM. That’s got to count for something.

 The Recipe:

Recipe from Smitten Kitchen:

  • 1 cup whole wheat flour
  • 1 teaspoon baking powder
  • Large pinch of salt
  • 1 cup granulated sugar plus 1 to 2 tablespoon (depending on sweetness of plums)
  • 1/2 cup unsalted butter, softened
  • 2 large eggs
  • 12 smallish plums (Italian purple if you can get them), halved and pitted
  • 2 teaspoons fresh lemon juice
  • 1 tablespoon ground cinnamon
  1. Heat oven to 350°F.
  2. Sift or whisk together flour, baking powder and salt in a medium bowl.
  3. In a larger bowl, cream butter and 1 cup sugar together with an electric mixer until fluffy and light in color. Add the eggs, one at a time and scraping down the bowl, then the dry ingredients, mixing until just combined.
  4. Spoon batter into a greased, 9-inch springform pan and smooth the top. Arrange the plums, skin side up, all over the batter, covering it. Sprinkle the top with lemon juice, then cinnamon, then remaining sugar.
  5. Bake until cake is golden and a toothpick inserted into a center part of the cake comes out free of batter (but of course not plum juice), about 45 to 50 minutes. Cool on rack.
  6. Leave it covered at room temperature overnight.