Found-Mulberry Scones

The first Friday of the month is reserved for recipes. You can see additional First Friday Food posts here.

The Reason:

I like scones as much as the next guy, but I have to be honest: pastry blenders kind of scare me. Well, it’s not so much that they scare me, it’s just that nothing I do with a pastry blender seems to turn out right. Too complicated to chop butter, too bulky to use as brass knuckles. What’s a boy to do?

So when I came across this recipe that does not use butter, I knew it was a match made in heaven. (Before you get too excited, it more than makes up for that in heavy cream, so you’re not exactly getting away with anything) (Except using a pastry blender)

The Journey:

The recipe calls for strawberries, so we tried that first and it is as good as advertised. However, we have been making this recipe with any kind of fruit we can get our hands on, strawberries, blueberries, and even scavenged mulberries.

It turns out that Chicago is absolutely crawling with mulberries, if you know where to look. In fact, even if you don’t know where to look, you can’t help but stumble upon them. Literally! Because they make the most god-awful, bird-dropping-looking mess all over the sidewalk or your car if you are unlucky enough to park under one.

It turns out we have not one but TWO excellent locations for scavenging mulberries right next to our house; the sidewalk outside of the YMCA and the grass lot surrounding the abandoned fire station. And nobody seems to mind one bit if you steal them.

2013_07_07_9999_16

Evie: “What does that sign say?”
Sara: “No trespassing, violators will be prosecuted.”

That’s right, ILLEGAL mulberries. That’s just how we roll around here. “Kids, it’s okay to ignore the law, as long as it results in delicious scones. Remember that.”

What a pain mulberries are! They are the most stain-y things on god’s green earth, and if you work with them you just have to commit to purple hands for the rest of the day. The first time I actually took all the little stems off, but I will never do THAT again, thank you very much. I couldn’t tell one bit of difference between the scones where I took them off and the ones where I didn’t. So there’s 30 minutes of my life I’ll never get back.

2013_07_07_9999_18

The Verdict:

I dare you to say to my face that you didn’t like these. Double-dog dare. We CAN NOT stop making them. They are a little moist and a little sweet and a lot wonderful. I would eat them every day. I would force my kids to illegally break and enter on public property to get at the ingredients if I had to.

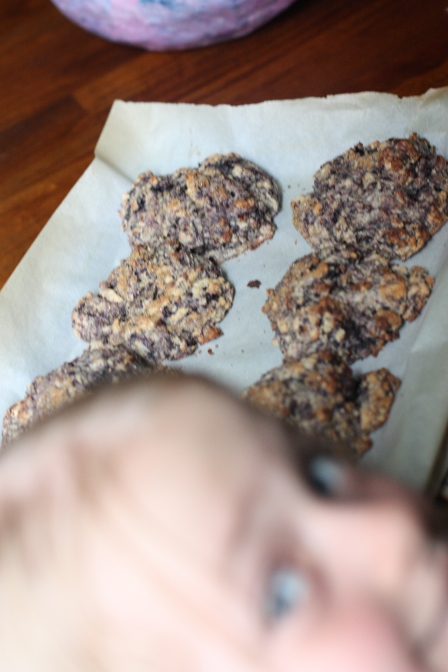
And don’t forget the most important ingredient: a pinch of photobomb

2013_07_07_9999_21

The Recipe:

Recipe (*very* slightly adapted) from West of the Loop.

  • 2 cups white whole wheat flour
  • 1 TB baking powder
  • 1/2 tsp. salt
  • 1/3 cup sugar
  • Zest of one orange (used a lemon in a pinch)
  • 1 1/4 cups heavy cream
  • 1 cup sliced strawberries (or whatever)
  • 1 1/2 tsp. Turbinado sugar
  1. Preheat the oven to 450 and line a baking sheet with a parchment paper.
  2. Whisk the dry ingredients together in a medium-sized bowl.
  3. Add the orange zest and the sliced strawberries. Gently toss the strawberries until they are coated in flour.
  4. Pour the cream in all at once and stir with a fork until the dough comes together. It will be wet and sticky.
  5. Scoop the dough onto the prepared baking sheet with a large spoon, making eight (largish) scones.
  6. Sprinkle 1/4 tsp. of Turbinado sugar on the top of each scone.
  7. Bake until firm and golden brown, about 15 minutes.
  8. Cool on a wire rack. Serve warm.

The Best Chocolate Cake

The first Friday of the month is reserved for recipes. You can see additional First Friday Food posts here.

The Reason:

The original reason we found this recipe was that Sara was looking for a cake recipe for Ollie’s birthday. But since that time we’ve made it over and over and over again, because it is unbelievably good. I mean, as a rule, chocolate cake is good, right? Well, this one is better.

The Journey:

Oliver had some very specific ideas about what his birthday cake, specifically demanding an “Easter” birthday cake. After finding this recipe, Sara wanted to put chocolate frosting on it, and Ollie declared, “Then I won’t eat it!”

The simple solution was just to make many cakes.

2013_04_21_9975

We made this one in a bundt pan, and the cake is basically a giant chocolate doughnut. Or, as Ollie puts it, an “O for Ollie”.

2013_04_21_9980

You’ll notice this post has a lot more pictures than an average food post, because this cake is so delicious that even the pictures themselves are delicious. I can’t stop taking pictures of it, or staring at them, or licking my screen. I defy you to look at this without your tummy rumbling:

2013_04_21_9978

The Verdict:

I mean, come on. At this point, what do I really have to tell you?

However, I did mention that it was very versatile. Here is a picture of Ollie’s beloved 3rd birthday “Easter” cake:

2013_04_13_9933

But it works as a regular cake too, and is just as delicious.

2013_06_01_9999_8

The Recipe:

Cake recipe adapted from Smitten Kitchen.

  • 1/2 cup (1 stick) unsalted butter, softened
  • 1/2 cup firmly packed light brown sugar
  • 1/2 cup granulated sugar
  • 1 large egg, at room temperature
  • 1 cup whole milk yogurt
  • 1 teaspoon vanilla extract
  • 1 1/2 cups white whole wheat flour
  • 3/4 cup cocoa powder
  • 1/2 teaspoon baking soda
  • 1/8 teaspoon salt

(Note that we doubled the above recipe to make the cake in a bundt pan)

  1. Preheat the oven to 325°F.
  2. Butter and lightly flour a 9x5x3-inch loaf pan, or spray it with a butter-flour spray.
  3. In a large bowl, on the medium speed of an electric mixer, cream the butter until smooth.
  4. Add the sugars and beat until fluffy, about 3 minutes.
  5. Add the egg and beat well, then the buttermilk and vanilla. Don’t worry if the batter looks a little uneven.
  6. Sift the flour, cocoa, baking soda, and salt together right into your wet ingredients. Stir together with a spoon until well-blended but do not overmix. Scrape down the batter in the bowl, making sure the ingredients are well blended.
  7. Pour the batter into the prepared pan.
  8. Bake for 60 to 70 minutes (It took us about 70 – 75 minutes for a bundt pan), or until a cake tester inserted into the center of the loaf comes out clean.
  9. Cool in pan on a rack for about 10 to 15 minutes, at which point you can cool it the rest of the way out of the pan.

Frosting recipe also from Smitten Kitchen (different recipe!)

  • 6 ounces good semisweet chocolate chips
  • 6 tablespoons heavy cream
  • 3/4 teaspoon instant coffee granules
  1. Melt the chocolate, heavy cream, and coffee in the top of a double boiler over simmering water until smooth and warm, stirring occasionally.
  2. Drizzle over the top of cooled cake.

Jerk Chicken and Sweet Potato Pockets with Homemade Jerk Seasoning

The first Friday of the month is reserved for recipes. You can see additional First Friday Food posts here.

The Reason:

I have an unreasonable love for things wrapped in a crust. Calzones, pasties (the FOOD kind you pervert) (although I guess the other kind aren’t so bad either, now that *you* bring them up) (pervert), you name it. I don’t know why covering it in dough makes it more appealing. It’s probably this irrational love that kept me eating disgusting lean-pockets for so long.

The Journey:

Hey, the jerk store called, they’re all out of seasoning! So we had to make our own. We found a pretty good recipe, but it made 26 cups of seasoning. Since we only needed 1 tablespoon, this was a bit of overkill, so we had to modify it just a smidge.

2013_03_10_9763

The first time we used ground pork instead of chicken, and it turned out amazing, so we just decided to stick with that. The pork just seemed to go well with the sweet potato. I’m sure chicken would be good too, but it saves you the hassle of having to shred it.

2013_03_10_9759

Making the pockets is pretty straightforward. My edges don’t stay crimped very well, even using a fork, but then again I’m just going to eat them, so who cares?

2013_03_10_9760

The Verdict:

So tasty. I’m always surprised at how many recipes we have for sweet potatoes. I never knew they were so versatile, but I love them in basically anything. You can’t go wrong! And now I know how to make jerk seasoning too (literally by the gallon), so maybe I’ll find some other use for that.

2013_03_10_9770

The Recipe:

Homemade Jerk Seasoning, inspired by allrecipes:

  • 1/8 teaspoon allspice
  • 1/8 teaspoon cloves
  • 1/8 teaspoon thyme
  • 1/8 teaspoon cinnamon
  • 1/4 teaspoon pepper
  • 1/2 teaspoon cayenne
  • 1/2 teaspoon sugar
  • 3/4 teaspoon garlic
  • 3/4 teaspoon salt
  1. Mix all ingredients.

Recipe from Eating Well.

  • 1 medium sweet potato (about 12 ounces)
  • 1 pound prepared pizza dough, preferably whole-wheat
  • 1/4 cup low-fat mayonnaise
  • 1 jalapeño pepper, minced
  • 2 tablespoons water
  • 1 tablespoon jerk seasoning
  • 8 ounces cooked boneless, skinless chicken breast, diced (about 2 cups, see Tip)
  • 1/4 cup thinly sliced scallions
  • 1/4 cup raisins
  • 2 teaspoons extra-virgin olive oil
  1. Preheat oven to 400°F. Coat a large baking sheet with cooking spray.
  2. Prick sweet potato in several places with a fork. Wrap it in wax paper or parchment paper and microwave on High until tender, 8 to 10 minutes. Cut in half. When it is just cool enough to handle, peel and dice.
  3. Meanwhile, shape the dough on a lightly floured surface into a log about 10 inches long. Divide into 5 equal pieces. Roll each piece into a 5-inch square with a rolling pin or press into a square with your hands.
  4. Whisk mayonnaise, jalapeño, water and jerk seasoning in a medium bowl. Stir in chicken, scallions, raisins and the sweet potato.
  5. Spread about 1/2 cup of the chicken mixture on half of each dough square, leaving a 1/2-inch border. Fold the dough over the filling and pat it to create a rectangle, then use a fork to crimp the edges closed. Transfer the chicken pockets to the prepared baking sheet and brush the tops with oil.
  6. Bake the pockets until golden brown, 15 to 20 minutes.

Crêpes!

The first Friday of the month is reserved for recipes. You can see additional First Friday Food posts here.

The Reason:

I’m still trying to burn through some of my stored-up food posts, and that means pancakes! So you’re getting another First Friday Food that is not on a First Friday.

As far as the reason to make crepes, one day it just occurred to me that I could make crepes. With whole wheat flour no less! We’re always looking for good pancake recipes, and crepes are a significantly different form of pancake.

The Journey:

First off, I’d like to specify that I originally learned how to make crepes from an actual frenchman. I don’t have his fancy pan or fancy crepe-scraping tool, but make no mistake, I know how to get the job done.

All that being said, flipping crepes is no joke, even if you don’t flip them in the air. There is certainly a skill to it. Be prepared to have ripped up and shredded crepes, even after making hundreds and hundreds of the things. Making crepes is somewhat stressful, and requires your full attention. But afterwards, you get to eat crepes, and the ripped up ones taste the same as the nice ones!

2013_04_21_9971

The recipe calls for the ingredients to be mixed in a blender. Do it! I tried everything I could to avoid it, including mixing with a mixer. It doesn’t work. If you get chunks in your batter, they will stick to the pan, and then you’re not going to get nice looking ones.

Also, use a LOT of butter on the pan, in between each and every crepe. You really can’t over-butter it. Just remind yourself you’re cooking like a French person, and throw an extra pat on there. You’ll thank yourself when you try to flip one.

The Verdict:

Making crepes is not that difficult, but it is a LOT of work. You have to make LOTS of them, because people will eat them way faster than you can make them. It’s a marathon, not a sprint.

But, might I add, they make you look very fancy pants impressive.

Crepes are so versatile. You can basically put anything on a crepe. Even setting aside savory crepes, you have jellies, jams, curds, marmalades, peanut butter, nutella, and just plain sugar. You could have these every day of the week and not get tired of them.

Well, not get tired of *eating* them. But you will definitely get tired of making them.

2013_04_21_9969

The Recipe:

Recipe from 100 Days of Real Food.

  • 3 eggs
  • 1 cup whole-wheat flour
  • 1 cup milk
  • ¾ cup water
  • 1 tablespoon honey
  • 1 teaspoon vanilla
  • ¼ teaspoon salt
  • 1 tablespoon butter, melted + extra for cooking
  1. Put all ingredients in blender and mix well. Let stand about 15 minutes.
  2. Melt and swirl around a small pat of butter in an 8 or 10-inch frying pan over medium heat.
  3. Angle pan and pour enough batter on one side to thinly and evenly cover the pan. Very quickly swirl the batter around to cover the pan in one thin layer.
  4. Immediately use your cooking spatula to push down the thin edges of the crepe around the perimeter.
  5. After about 1 minute (and once it is golden brown on the bottom) carefully flip it over without tearing the crepe.
  6. Fry for 1 more minute on the other side (until it is golden brown as well) and then roll up each crepe.

White Bean and Tuna Salad with Radicchio and Parsley Vinaigrette

The first Friday of the month is reserved for recipes. You can see additional First Friday Food posts here.

The Reason:

Boy, I don’t know where this one came from. I think we just saw it in Bon Appetit and decided to try it. But the real reasons to make it are, 1) it’s delicious, and 2) it’s SUPER quick and easy.

The Journey:

This would work well as a fancy-pants side dish, but we just serve it as a meal, all by itself. I guess it has a lot of oil in it, but other than that it’s about as healthy as a dinner comes, and packs a lot more flavor than your average salad. Plus it’s different and interesting. I’m really having trouble thinking of any downsides.

2013_03_06_9746

Radicchio is a little bitter, so normally I’m not a huge fan. But in this case, the bitterness really sets off the vinaigrette perfectly, and the tuna and beans give it texture and some staying power in your tummy.

2013_03_06_9748

The Verdict:

I feel like a broken record here, but we have an endless appetite for quick, easy, and healthy recipes. We can never have enough of them. This one is in heavy rotation for nights when Sara and I both work.

2013_03_06_9750

The Recipe:

Recipe originally from Bon Appetit:

Parsley Vinaigrette

  • 2 cups (packed) flat-leaf parsley (leaves and stems)
  • 1/4 cup olive oil
  • 3 tablespoons fresh lemon juice
  • 1 tablespoon Champagne vinegar (we found it at Trader Joes)
  • 2 garlic cloves, crushed
  • Kosher salt and freshly ground black pepper
  1. Pulse parsley, oil, lemon juice, vinegar, and garlic in a food processor until well blended. Season to taste with salt and pepper (~1/4 teaspoon salt and ~1/8 teaspoon pepper).

White Bean and Tuna Salad with Radicchio

  • 1 medium head of radicchio, cored, leaves coarsely torn
  • 2 15-ounce cans cannellini (white kidney) beans, rinsed, drained
  • 2 celery stalks, sliced thinly on an extreme diagonal
  • 2 cans drained olive oil–packed tuna
  1. Place radicchio in a large bowl; drizzle with 3 Tbsp. Parsley Vinaigrette and toss to coat.
  2. Transfer to a serving platter, spreading out in an even layer.
  3. Combine 3 Tbsp. Parsley Vinaigrette, cannellini beans, and celery in the large bowl; toss to coat.
  4. Arrange bean mixture on top of radicchio.
  5. Top salad with tuna.
  6. Drizzle some vinaigrette over.
  7. Add more salt and pepper, to taste.